Editing a Rebate
Refer to Case 9596
Opening "Edit Rebate" Form
The three ways to open the "Edit Rebate" form:
- By "Add Rebate"
- The first way to open the "Edit Rebate" form is by clicking the grey "Add Rebate"
button on the "Add Rebate" Form after filling in the relevant fields with good data.
- By "Rebate Search Results"
- An alternative way to open the "Edit Rebate" form is by clicking the "Edit Rebate"
button on the "Rebate Search Results" form while the existing rebate is selected.
- By Double-Click
- Or, another alternative, convenient way to open the "Edit Rebate" form is by simply
double-clicking on the rebate you wish you edit on the "Rebate Search Results" form.
A Look at the "Edit Rebate" Form
The Top Section:
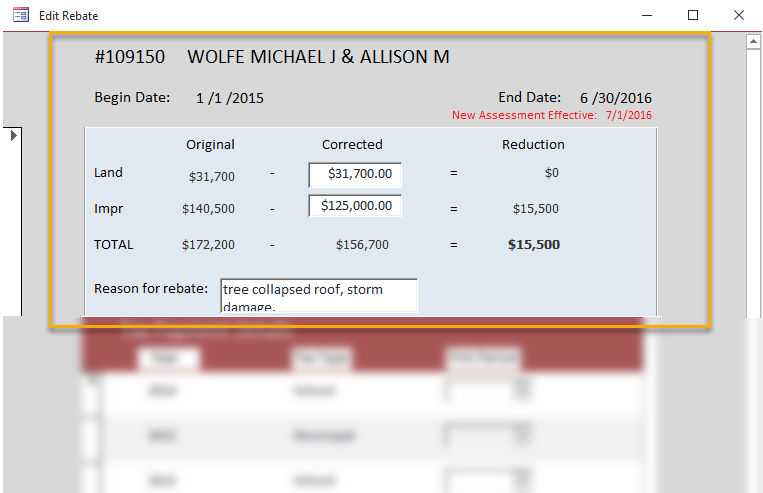
The top section of the form contains the following:
- The rebate's owner's control number and full name
- The rebate's start date (Begin Date) and end date
- The reason for the rebate's end date (the red text)
- The "blue matrix" from the "Add Rebate" form that holds the original, corrected, and reducted values along with the reason for the rebate.
The Bottom Section:
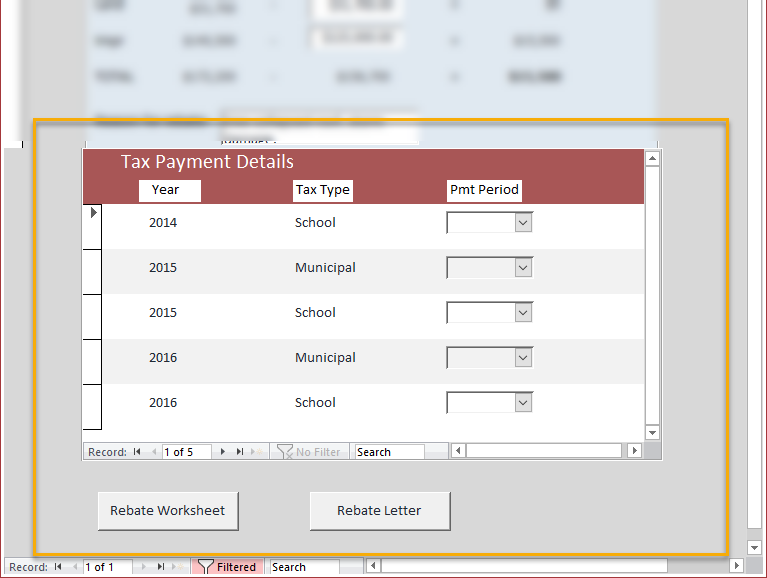
The bottom section of the form contains the following:
- The subform, "Tax Payment Details," that creates records for each tax bill based on the span of the rebate.
- The "Rebate Worksheet" button that generates a report detailing how the rebate amount is calculated.
- The "Rebate Letter" button that generates three letters for each taxing district and details the rebate amount owed to the specified property owner.
Editing Assessment Information
To demonstrate the functionality of the "Edit Rebate" form, let's say we accidentally entered the incorrect "Corrected" value for improvement.
Instead of $125,000, the value should have been $128,000.
We need to fix this value before we finalize the rebate. This can be done by simply editing the corrected improvement assessment value in the
blue matrix.
If you change the value of the corrected assessment, you should notice a change in the "Reduction" running total column. In this case, the reduction total went from $15,500 to $12,500.
We can also edit the "Reason for rebate" via the text box at the bottom of the blue matrix.
Entering Tax Payment Details
The only required fields a user must enter in "Edit Rebate" (assuming the corrected value/rebate fields are not blank)
are the "Pmt Period" boxes in the "Tax Payment Details" subform.
For each municipal/school tax year, click on the "Pmt Period" combo box and select the accurate period by which the owner paid their bill:
Ensure that you scroll all the way down to the bottom of the subform so that no payment periods are left blank.
"County" tax bills are generated later.\\
Data You Cannot Enter
Note: It is worth mentioning that the rebate start date and end date are not editable in the "Edit Rebate" form.
You cannot enter the following data into the "Edit Rebate" form:
- Blank assessment value fields/reason for rebate
- Blank payment periods

