Electronic Filing of 1099s
Electronic submission of 1099s is done differently for state and federal.
Federal 1099 Submission
Federal submission of the 1099 is done through the Filing Information Returns Electronically (FIRE) portal. The portal has a separate area for test submissions (https://fire.test.irs.gov/) and final submissions (https://fire.irs.gov).
The two sites (test and final) are completely independent. A separate user name and password is required for each site. The same credentials may be used for both. Changing the password on the test site, however, does not update the password on the final site, and vice versa.
The system allows submitting multiple test files. Test files should be submitted to ensure that there have been no changes in format from the previous year.
Submitting a Test File
- From the AP Main Menu, click on Reports, then Forms 1099, and then TXT Export for Federal. This will open the Federal 1099 FIRE Exports Form.
- At the bottom of the Federal 1099 FIRE Exports Form, there is a button to create the file. Ensure that the year and minimum 1099 amount fields are set correctly, choose the "Test" radio button, and then click the Create File button.

- Once the file is created, Windows Explorer will open to the folder where the file is located. (The folder location may be changed via Utilities --> Change Company Info --> Export Location.)
- Click "Logon" and enter credentials
- Click the "Continue" link at the top of the Important Bulletins page
- Click the "Send Information Returns" link on the top left of the page
- Enter the TCC and TIN (this information may be found on the Company Information Form)
- Verify the filing information and click Accept after making any necessary changes
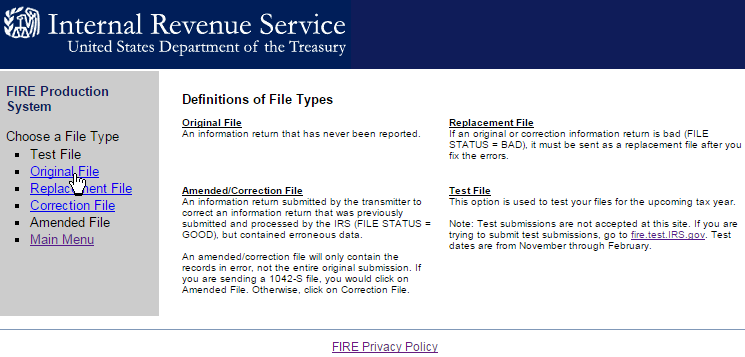
- Click the "Test File" link from the menu on the left side of the page
- Click the "Choose File" button
- Browse to the folder location opened above
- Double-click the file that was just created
- Click the "Upload" button
Submitting the Final File
- From the AP Main Menu, click on Reports, then Forms 1099, and then TXT Export for Federal. This will open the Federal 1099 FIRE Exports Form.
- At the bottom of the Federal 1099 FIRE Exports Form, there is a button to create the file. Ensure that the year and minimum 1099 amount fields are set correctly, choose the "Final" radio button, and then click the Create File button.

- Once the file is created, Windows Explorer will open to the folder where the file is located. (The folder location may be changed via Utilities --> Change Company Info --> Export Location.)
- Go to https://fire.irs.gov/
- Click "Logon" and enter credentials
- Click the "Continue" link at the top of the Important Bulletins page
- Click the "Send Information Returns" link on the top left of the page
- Enter the TCC and TIN (this information may be found on the Company Information Form)
- Verify the filing information and click Accept after making any necessary changes
- Click the "Original File" link from the menu on the left side of the page
- Click the "Choose File" button
- Browse to the folder location opened above
- Double-click the file that was just created
- Click the "Upload" button
State 1099 Submission
Submission of the 1099-M to Pennsylvania is done through the e-TIDES website. There is no test process for the state submission. The state file should be submitted immediately after submitting the final federal file.
- From the AP Main Menu, click on Reports, then Forms 1099, and then CSV Export for PA.
- This will bring up a "Save As…" dialog box. Verify the default file name and location are still OK, then click on the [Save] button.
- Log in to the e-TIDES website: https://www.etides.state.pa.us/
- From the left-hand menu, click on the "File Upload" link
- From the "- Select Tax System -" dropdown box, choose "Employer Withholding Tax" and click [Next]
- At the bottom of the page, click on the link "Choose File to Upload". A popup window should appear.
- Click the radio button to the left of "1099-M Miscellaneous Distributions"
- Click on the [Browse…] button
- Browse to the folder where the CSV file was saved earlier
- Double-click the file that was just created
- Click the [Submit] button
- The original page should refresh with the newly uploaded file; if the file is not shown, reload the web page
- Click on the radio button next to the file that was just uploaded, then click [Next]
- The next page to open is the "Select Columns" page; ensure the dropdowns are set as follows (left-to-right, top-to-bottom):
- Payer's PA Account Number
- Tax Year
- Recipient's SSN/EIN
- Recipient's Number
- Recipient's Name 1
- Recipient's Name 2
- Recipient's Street Address
- Recipient's City
- Recipient's State
- Recipient's Zip Code
- Rents
- Royalties
- Nonemployee Compensation
- PA State Income
- State Tax Withheld
- Payer's Entity ID
- Type of Entity ID
- Once these have been verified, click [Next]
- The next page will show the total number of Valid and Invalid Records; click [Insert Records]
- This completes the process; the final page should show the results of the upload; the Status should read, "File upload and import Finished Successfully"