Table of Contents
Reports Menu
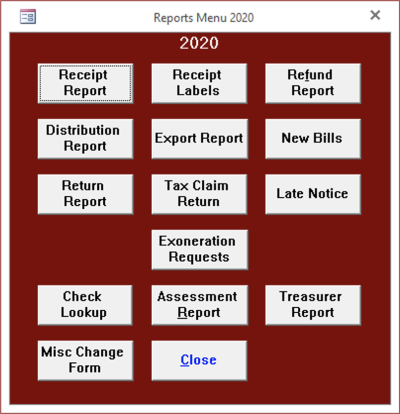
When you Export Payments you should also create the New Bills report, Assessment Report and Treasurer Report on the same schedule. This will insure that your records and those of the taxing bodies will remain in synch and will avoid many problems.
When you create some of these reports for a school district, the program will prompt you for the name. If you have only one school district it will fill in automatically. This provides the ability to run separate reports for the tax collectors that have more than one school district.
Most reports include the date in the title bar of the preview. If you print the report to PDFCreator this becomes the default name for report making it easy to keep and identify multiple copies of the same report.
Receipt Report
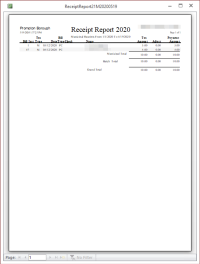
In order to create one of these reports you must enter the start and end dates that you entered the receipts in the program and the order in which you wish to view the report. Receipt order prints the receipts in the order you entered them in the program, bill order prints them sorted by the bill number and Tax Map prints them in order by the parcel number. The receipts are grouped by batch and tax type, Municipal or School. Grouping payments by batch is optional but may be helpful during periods when you receive a large number of payments. This report includes the payer’s name, bill number, check number, date the receipt was entered in the computer, taxes received and any adjustment required to reconcile with the total amount paid by the taxpayer. This report is intended to help the tax collector reconcile the amounts posted in the computer with the payments received.
Receipt Labels
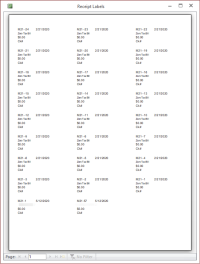
This process creates labels that you can use to post payment to the paper duplicate. The program will print on either standard address labels, 30 to sheet or on smaller labels that come 80 to a sheet and correspond to Avery 5167 or 8167. The program creates labels for both the municipal and school taxes at the same time. The first line starts with an M or S for the bill type, then the district number, bill number and payment date. The second line has the name of the payee. The third lists the payment amount and the fourth displays the check number. The program will prompt you for the number of labels to skip. This will allow you to use the remainder of partially used sheets of labels. If you are using a new sheet of labels, then enter 0 labels to skip.
Refund Report
This report lists payments that have overages that exceed the refund level established in the program settings. It includes the payment date, tax type, bill number, payer and any information you entered in the PaidBy field when posting the payment.
Distribution Report
In order to create one of these reports you must enter the start and end dates that you entered the receipts in the program and the tax authority, county, municipal or school. It is important to remember the ending date of the report you submit so that you do not overlap or leave a time gap the next time you run the report. Using an incorrect date could result in under or over remitting taxes. This system allows the tax collector to collect taxes for two different payment periods at the same time and to remit them together. These reports show the payer’s name and bill number along with the amounts to remit to the respective taxing bodies grouped by bill type and payment period in bill number order. Voids appear as negative numbers on the distribution report for the void date. This means that if a check fails to clear after remitting the payment to the taxing authority, the program will reduce total amount to remit on a subsequent report by the amount of the returned payment.
Export Report
These processes create files containing receipt information that corresponds to he Disbursement Report. When you export data, the program will ask you the start and end dates to export. The program will create this file in the TaxCollection folder for this tax year and your designated Export Drive, if it is different than C. The county export file will have the name County##YYYYMMDD.txt where ## is your district number and YYYYMMDD is the ending date for the exported payments. Similarly, the files for the township will be named Muni##YYYYMMDD.txt. The school file will be named School##SYYYYMMDD.txt where the S before the date identifies the school district. This provides for the tax collectors who remit to multiple school districts. If a file by this name already exists, the program will replace it with a new file. The export process also produces a summary report of the data in the export file. You should print this report and submit it with the data. You may submit this file to the county on CD or by email. When you close the Export Report the program will ask you if you want to create ledger entries for this report. If you choose yes it will create the collection records that correspond to the amounts that appear on the report. It will also create a remittance record for the amount on the report. If you choose to create the collection records this way you will not need to use the Create Collection Records button on the Ledger Menu. When you run this process the program will automatically run the reports below named New Bills and Treasurer Report. You should send in any files and reports created by these processes along with the receipts file created by this process.
New Bills
After you click this button, the program will prompt you for a start and end date and a tax type. It will then create a file containing the bills that you created between the specified dates. The program will name the file for the county NewBillsXXMuniYYYYMMDD.txt and the file for the school NewBillsXXSchoolYYYYMMDDZ.txt where XX is your district number, Z is the school district letter and YYYYMMDD is the ending date. When the export is complete, the program will display a report showing the bills stored in the file. It is important that the treasurer and schools have your new bills before they receive payments for those bills. If you always Export Payments and Export New Bills at the same time with the same start and end dates, you will have fewer dates to keep track of and the taxing bodies will always have the bills ahead of the payments. This export only exports the bills the tax collector creates, the ones numbered 20,001-29,999. The program will not export bills imported from the assessment office. The location of the file depends on your setting for the export drive. If the export drive is set to C, the program will write the file to the TaxCollection folder for this tax year where you can burn it to a CD or send it as an email attachment.
Return Report
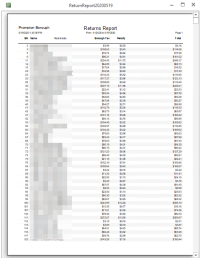
This report lists all of the unpaid tax bills as separate reports for the county, municipality and school district. You can run separate reports for real estate and per capita. You also have an option to put the taxpayer’s address on the report. Which reports you need to create and in which formats depends on the reporting requirements of your taxing districts. The prompts for this report include a receipt cutoff date. When printing the list of unpaid bills the program will only consider receipts up to and including the cutoff date. This will allow you to create the same report as you did at an earlier date even after you post additional payments. The bills for which you have requested exoneration, but have not exempted, appear at the end of the Per Capita/Occupation section of the Return Report. Their listing includes the reason that you requested exoneration. These bills have their own subtotal as well as being included in the total of all unpaid Per Capita/Occupation bills.
When you create the Return Report the program will also export the data to a CSV (text) file. When it completes it will display a message box with the location and name of the file. CSV files can be opened by a variety of programs including Excel which may be helpful to some users.
Tax Claim Return
The return consists of two reports, a summary sheet and the sheets reporting the unpaid bills and amounts. When you create the municipal return the program will create a file on your export drive named TCyyyynnM.txt, where nn is your district number. When you create the school return the program will create two files on your export drive named TCyyyynnS.txt and TIyyyynnS, where yyyy is the tax year and nn is your district number. These files contain the information printed on the return and must be turned in to the Tax Claim office. If you turn in both taxes together the program will create files named TCyyyynnB.txt and TIyyyynnB.txt. Providing these files to the Tax Claim office electronically dramatically decreases the time and effort required to process the new claims. If the tax collector turns in the tax claim information electronically the Tax Claim Office will handle printing the return. The tax collector will check this printed report before submitting it to the Tax Claim Office.
When you close the Tax Claim Summary the program will ask if you want to have lien records created for the ledger. Lien records will bring the final balance on the Monthly Report to zero, reflecting that you have turned the taxes in to Tax Claim. If, for any reason, you do not want the program to create the lien records then click No.
Late Notice
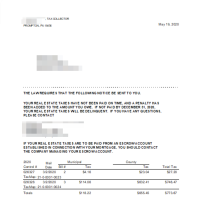
This process creates a late notice for each unpaid bill. You may create late notices for real estate bills, per capita/occupation bills or both together. You may create the notices for municipal taxes, school taxes or both together. You have the option to print in either alphabetic or zip code order. If you fold on the dotted line the address block at the top should appear in a window envelope. You can also add additional text to the basic notice (refer to the Settings section for details). If you prefer to design your own notice, the program also creates a file named LateNotice.txt and puts it in the Tax Year folder so that you can use it with a word processor to do a mail merge. When you print late notices for a school tax, the program will prompt you for a Tax Claim Year so that you can create late notices for interim school bills mailed after the first of the year without printing notices for the prior year bills.
If a taxpayer owns multiple parcels the program will combine the bills onto a single notice. It will not combine real estate bills with per capita/occupation bills, however if you create the notices together they will print relatively close together. If you intend to print both kinds of notice and put them in the same envelope this makes the job of hand collating them a little easier.
Check Lookup
Assessment Report
This report produces a list of changes made between two specified dates for reporting to the Assessor’s office. These include changes of name and address and deletion and exoneration requests. Do not report changes made from Transfer Listings or letters sent by the Assessor’s office. See the section titled Changing Bill Information for more information on including items in this report. When the program produces this report it also creates a file named AssessorDDYYYYMMDD.txt in the TaxCollection folder for this tax year which contains the same information. Wayne County tax collectors should send this file to the Assessment Office.
Treasurer Report
This report produces a list of all changes made between two specified dates that affect the amount of tax the taxing bodies should expect to receive. Send the municipal Treasurer’s report to the office responsible for receiving your county taxes and the school Treasurer’s report to the School Districts. The Treasurer’s Report will include bill amount changes so it is important that they receive it before they receive the payments for the effected bills. If you send these reports in each time you do a distribution, it will ensure they receive them in a timely manner.
Misc Change Form
This form allows you to report changes not related to a bill. For example if you identify a new resident you can report their name and address on this form. The program will report these changes on the Assessment Report.
Transfer School Taxes
This process is used only by some School Districts in Adams County and Montgomery County. Please contact your school district to determine whether or not to perform the transfer. If you are going to perform the Transfer School Tax process you must do it before importing your regular school tax file.
This process will transfer unpaid school taxes with a mail date after the first of the year from the current file to the file for the following year. For instance, if you are transferring unpaid school bills from the 2009 file to the 2010 file you would open the 2009 file and click on Transfer School Taxes. The program will prompt you for a date. All unpaid bills and any bills paid on or after the date you enter, with a Mail Date after the first of the year, will be copied to the 2010 file. If you only want to transfer unpaid bills leave the date blank. If you have chosen to copy any paid bills, their receipts will also be copied to the new file so they will still be marked as paid.
The program will also create starting balance ledger entries for the total of the bills transferred in the new file and deduction records in the old file. If you have already created collection records for the paid bills in the old file you will have to create them again in the new file. After you have transferred the taxes to the next year you will be unable to accept payments for them in the old year.
If you transfer the unpaid taxes to the next year and they remain unpaid they will be turned in to Tax Claim when you do the return for that year. If you do not transfer them, you will need to create a Tax Claim return from both files.
Normally this transfer will take place immediately after unpaid taxes are turned in to Tax Claim so your records should match the school district’s records. It is especially important that you coordinate the transfer with your school district as they will have to transfer the records in their system too and we want to ensure that the same records are transferred in each system.
School districts please note that your transfer process works one district at a time. In this way, you can make sure your records match before performing the transfer. It is important that once you have transferred the first district that you do not create or import any new bills until the last district is transferred. This should not be a problem but you need to be aware of it.
