Table of Contents
Rebate Reports
Rebate Worksheet
Refer to Case 9597
Opening and Analyzing
Let's open the Rebate Worksheet.
From the "Edit Rebate" form, click the "Rebate Worksheet" button on the bottom underneath the "Tax Payment Details" subform.
The "Rebate Worksheet" will appear as a report.
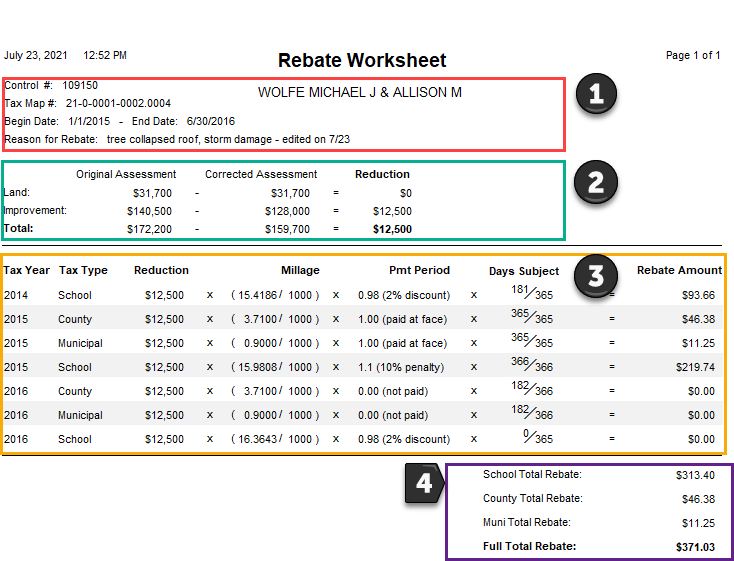
The Rebate Worksheet:
Where numbers are assigned in the picture, read the details for each section where the numbers relate.
- Owner information, rebate information
- Original, corrected, and reducted assessment values and their totals
- Each tax payment detail record and how the rebate amount for each tax bill was calculated. Can be verified by the user by completing the calculations displayed left to right.
- The running totals of the individual school, county, and municipal rebate amounts along with the sum of all three for a total rebate amount.
Payment Periods and Days Subject
Payment Periods:
For the sake of demonstrating the rebate worksheet, the payment periods for our scenario have been varied
(previously, they were all entered as "Discount").
Let's look at how each payment period type affects the values on the "Rebate Worksheet."
The payment period exists as a number with a decimal whose value changes depending on which
payment period was selected. For instance, a payment period of "face" will always be 1.00,
as no penalty nor discount exist. A payment period of "not paid" will always be 0.00.
For the school tax year of 2015, the penalty percentage is 10%; therefore, the "Pmt Period"
value we multiply by is 1.1, which adds the penalty to the running number. The same is true
for the 2% discount, except its value exists as the percentage amount less the value of 1.00.
Days Subject:
The "Days Subject" column signifies the number of days in the tax year per tax type subject to the rebate's scope.
For the school bill in 2014, we can see that the running number is multiplied by the operation, 181 divided by 365.
This means, that since our rebate started January 1st, 2015, we are accounting for the days within the 2014 school
bill that the rebate takes effect on (which would be January 1st - June 30th of 2015).
The days in the 2014 school bill between July 1st, 2014 and December 31st, 2014 are not subject to the rebate, so
they are excluded from the operation.
Rebate Letter
Refer to Case 9606
Opening and Analyzing
Generate a rebate letter with the rebate amounts to be sent to the taxing districts.
From the "Edit Rebate" form, click the "Rebate Letter" button on the bottom underneath the
"Tax Payment Details" subform. The "Rebate Letter" will appear as a report.
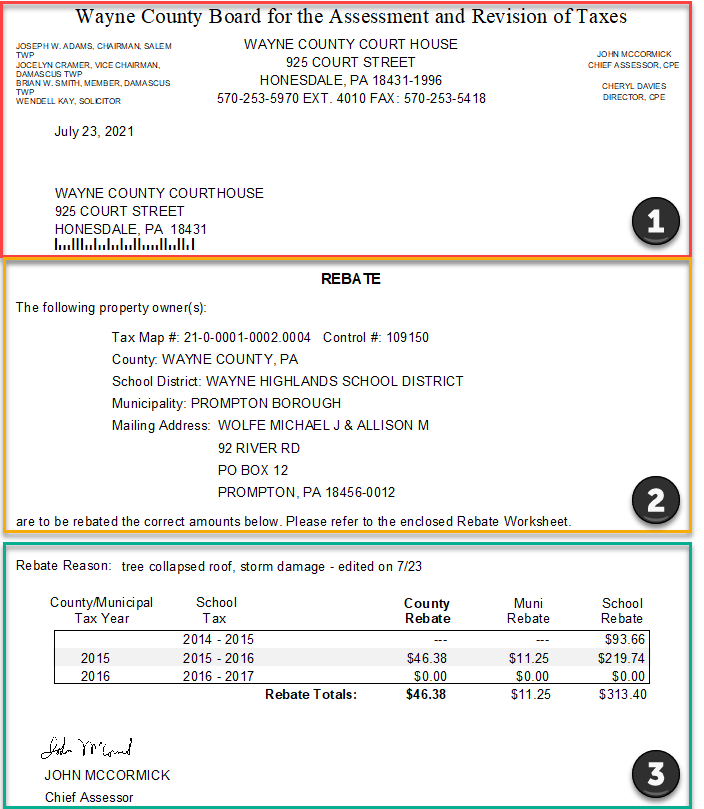
The Rebate Letter:
Where numbers are assigned in the picture, read the details for each section where the numbers relate.
- The header - recipient's address
- Property owner(s)' information
- Corrected amounts/Rebate amounts
Report Types
At the bottom of the "Rebate Letter" report window, you should see a "Page" selector.
Clicking the right arrow will cycle through the three pages that should be returned.
Each page is a separate report for each of the taxing districts:
- Page 1 is the County Rebate
- Page 2 is the Municipal Rebate
- Page 3 is the School Rebate
As you cycle through the reports, you will notice the relevant values will be in bold.
Also, the recipient's address changes based on which taxing district the report is for.
Finalizing a Rebate
Caution: finalizing the rebate prevents you from directly editing the rebate from the "Edit Rebate" table.
You can still amend a rebate, though.
The last step in the rebate process is to finalize the rebate. Here's how:
- Open the rebate letter from the "Edit Rebate" form and ensure accurate details.
- Close out of the report. You will see the following prompt: "Did the letter print correctly?"
- On clicking "No," the prompt disappears, and the "Edit Rebate" form will be visible with no changes.
- If the letter has been printed correctly and you are ready to finalize the rebate, click "Yes."
- After clicking "Yes," you will notice that the "Edit Rebate" form refreshes, and you can no longer make
changes to the rebate as the controls are locked. - Underneath the "Rebate Letter" button in the "Edit Rebate" form, you will find a text that reads,
"Letter Sent On: " with the current date next to it. This date is recorded as the day a user finalized and sent out
the rebate letter to the taxing districts for record purposes.


